

SFM Compile: Is Your Complete Guide to Rendering in Source Filmmaker
SFM Compile is the core rendering process inside Source Filmmaker that every animator must understand. Source Filmmaker is a free tool created by Valve in 2012 using the same engine as Team Fortress 2. It allows creators to make cinematic animations, short films, and promotional posters completely free.
The compile process converts your finished animation timeline into a viewable video or image output. Without understanding SFM, your final videos will always look rough and unprofessional. This guide covers every important step from basic settings to advanced rendering techniques clearly.
What SFM Compile Means in Source Filmmaker
SFM Compile is the process where Source Filmmaker renders every frame of your animation into the final output. The software calculates lighting, shadows, particle effects, and camera settings for each frame. It uses a progressive refinement system that improves image quality with every additional render pass.
More passes mean cleaner images, but longer compile times always. Output can be saved as image sequences or exported directly as a video file. Understanding this process helps you plan your workflow and avoid wasting valuable render time.
How the Compile Process Works
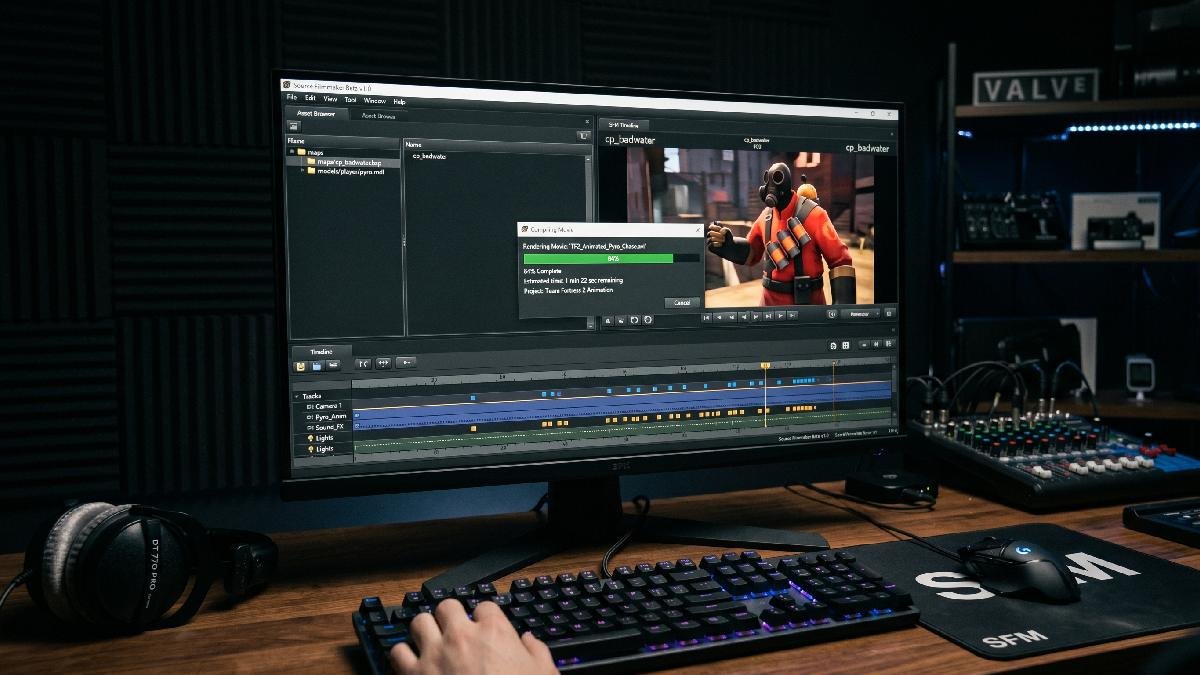
The compile process starts after you finish all animation and lighting inside your scene. Open the render settings by clicking Film, then Render Movie in the top menu. Set your resolution, frame rate, pass count, and output folder before starting.
Click Start Rendering, and SFM will process every frame one by one automatically. Monitor the render window for any errors or crashes during the process. Once finished, your rendered frames are saved and ready for editing or direct use.
Common Rendering Terms You Should Know
Progressive refinement means each frame improves quality with every additional render pass added. A render pass is one complete light calculation scan across every pixel in the frame. Depth of field blurs objects outside the camera’s focal range for a cinematic look.
Motion blur adds directional blur to fast-moving objects, simulating real camera capture. Ambient occlusion adds realistic contact shadows where surfaces meet inside your scene. Frame rate, measured in FPS, controls how smooth your final animation plays back.
SFM Compile Settings You Must Configure Correctly
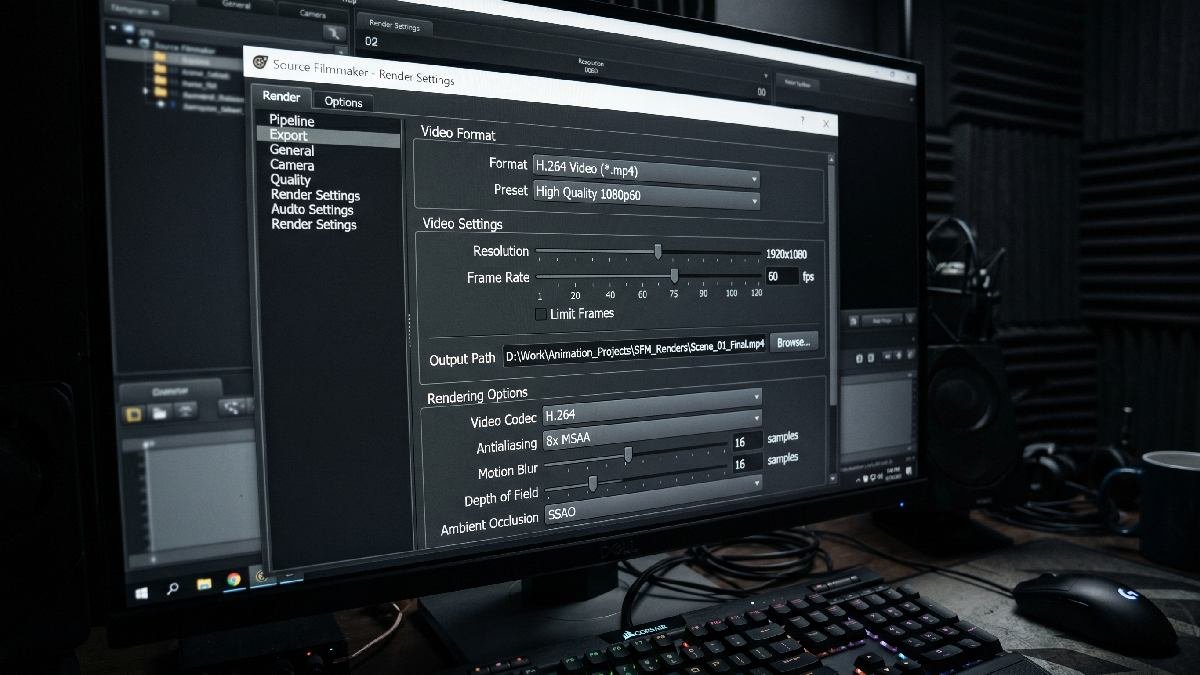
The render settings panel has six key options you must set correctly before every compile. These are resolution, frame rate, render passes, output format, frame range, and output folder path. Wrong settings cause poor quality output, black frames, or extremely long, unnecessary render times.
Higher resolution and more passes produce better results, but increase compile time significantly. Always match your frame rate to your target platform for smooth and correct playback. Double-check all settings before starting any long render to avoid wasting hours.
Resolution and Frame Rate Explained
Resolution 1280×720 renders four times faster than full HD 1920×1080, making it great for testing. Full HD 1920×1080 is the standard for YouTube and most professional video platforms today. Ultra HD 4K produces stunning detail but takes ten times longer to compile than HD.
Use 24 FPS for cinematic film-style animations with a classic Hollywood movie feel. Use 60 FPS for smooth action sequences and fast-moving character animation projects. Always set both values correctly before beginning your SFM compile to avoid output errors.
Render Pass Count Guide
At one pass, images look very grainy, especially in dark and shadowed areas of your scene. Eight passes give acceptable quality suitable for quick test renders and rough animation checks. Sixteen passes produce clean results good enough for most standard animation projects today.
Thirty-two passes give near-professional quality with smooth lighting and minimal visible noise. Sixty-four passes are for high-end cinematic projects that demand absolute perfection in output. Each time you double the passes, the total render time also roughly doubles in length.
Output Format Choices
TGA image sequence saves each frame as a separate numbered file, giving maximum quality output. PNG image sequence offers lossless quality with smaller file sizes than the TGA format. Both image sequences give full control during post-production editing in external software.
AVI video exports everything as a single compressed file for quick and easy sharing. For professional projects, always choose image sequences over AVI to preserve maximum output quality. Create a dedicated folder for each project to keep all compiled files properly organized.
SFM Compile Errors and the Right Way to Fix Them
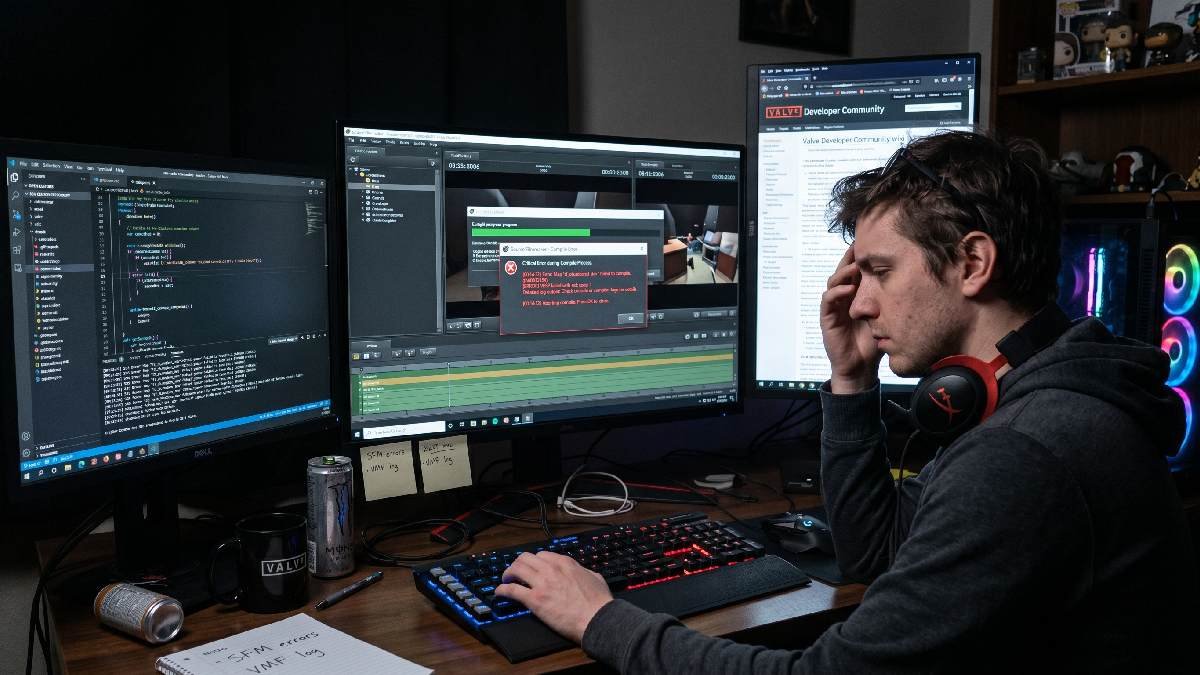
Five common SFM Compile errors affect most users at some point during their animation work. These are missing textures, memory crashes, corrupted models, black frames, and audio sync problems. Missing textures appear as pink and black checkerboard patterns on models during rendering.
Memory crashes happen when your GPU or RAM runs out of resources during complex scenes. Black frame errors occur when lighting is wrong or render passes are set too low. Knowing these fixes in advance saves hours of frustration and protects your project work.
Fixing Missing Texture Errors
Missing textures happen when SFM cannot locate the VMT and VTF files linked to your models. Custom content must be placed inside the usermod folder in your Source Filmmaker directory. The correct path is SteamApps/common/SourceFilmmaker/game/usermod/materials for all texture files.
Workshop items must be fully subscribed to and downloaded through Steam before opening your project. The SFM console window shows exact error messages identifying which texture files are missing. Reading console errors carefully always points you directly to the specific missing file location.
Solving Crashes and Long Render Times
Source Filmmaker needs a minimum of 8 GB RAM, but 16GB is strongly recommended for complex scenes. GPU memory errors occur when scene textures exceed your graphics card’s VRAM capacity limits. Remove unnecessary high-polygon models to reduce VRAM load and improve compile stability.
Set Windows virtual memory page file to at least 16GB for extra memory buffer during compile. Split long animations into shorter segments to prevent single-session memory overflow crashes. Monitor GPU temperature using MSI Afterburner to prevent thermal throttling during long renders.
Advanced SFM Compile Techniques for Professional Results
Advanced techniques separate average animations from truly cinematic and professional-quality productions. Mastering depth of field, three-point lighting, motion blur, and post-processing transforms your output completely. Multi-layerpost-production rendering separates scene elements for more precise post production color grading control.
Custom camera rigs with realistic lens settings make compiled output feel like real film footage. Proper scene optimization before compile reduces render times without sacrificing noticeable visual quality. Commit to learning one advanced technique at a time for consistent and steady quality improvement.
Depth of Field and Motion Blur Settings
Focal distance determines which objects appear sharp and in focus during your compile render. Objects closer or farther than the focal distance become progressively blurred, creating a natural bokeh effect. F-stop controls blur strength, with lower values creating stronger background blur in scenes.
For portrait shots, set the f-stop between 1.4 and 2.8 for a strong background separation effect. A shutter angle of 180 degrees in camera settings produces natural film-style motion blur. Combining subtle depth of field with motion blur makes your SFM Compile look truly cinematic.
Three-Point Lighting for Cinematic Output
Key light is your primary source positioned at 45 degrees to your subject at 200 to 400 intensity. Fill light on the opposite side at half key light intensity softens harsh unwanted shadows. Rim light positioned behind the subject, pointing toward the camera, always adds a professional edge definition.
Color temperature 3200K creates warm indoor scenes, while 5600K produces cool outdoor lighting mood. Using colored gels on fill and rim lights adds dramatic visual interest to your scene. Correct three-point lighting makes every SFM Compile output look dramatically more professional and polished.
Post Processing After SFM Compile
Import your TGA or PNG image sequence into DaVinci Resolve, which is completely free to use. Apply a LUT first to establish the overall cinematic color tone and visual style. Adjust shadows, midtones, and highlights separately using the color wheels in the grading panel.
Add subtle film grain between 10 and 20 percent for organic texture and a cinematic feel. Apply a slight vignette to naturally draw the viewer’s attention toward your central subject always. Export the final video at H264 or H265 codec for the best balance of quality and file size.
SFM Compile Tips Every Beginner Must Follow
Always do a short test render before committing to any long full-quality compile session. Test renders at low pass counts reveal scene problems like missing textures and lighting errors quickly. Save your project in multiple numbered versions like Project_v01 and Project_v02 for safety.
Remove all models and lights not visible in the camera to keep your scene fully optimized. Use the SFM console window regularly, as it shows real-time warnings and errors always. Join the Source Filmmaker Steam community for thousands of tutorials, templates, and expert advice.
Best Starter Settings for New Users
Set resolution to 1280×720, which renders four times faster than full HD for practice. Choose 24 FPS as the standard cinematic frame rate for your first animation projects. Set render passes to eight for clean enough results without extremely long wait times.
Use the AVI output format for your first projects to create one simple, easy-to-manage file. Keep your scene simple with no more than three models and three basic lights total. These settings make your first SFM Compile experience fast, clean, and educational always.
Best Online Resources for SFM Learning
The official SFM Steam community hub has active forums, tutorials, and project sharing for all users. YouTube channel SFM Tutorial Hub offers detailed step-by-step video guides for every skill level. Reddit community r/SFM has over 200,000 members sharing work and offering helpful render feedback.
Steam Workshop provides over 500,000 free models, maps, and assets for your SFM projects. SFMlab website offers additional models and resources not available on the Steam Workshop platform. Valve’s official Source Filmmaker wiki documents every tool, panel, and setting in technical detail.
FAQ
What exactly is SFM Compile?
A: SFM Compile is the rendering process that converts your Source Filmmaker animation into a finished exportable video file.
How many render passes should I use?
A: Use sixteen passes for standard projects and thirty-two passes for high-quality cinematic render output.
Why does my SFM compile show black frames?
A: Black frames are caused by incorrect lighting setup or render passes being set too low for your scene.
What is the best output format?
A: PNG or TGA image sequences are best for professional editing, while AVI works for quick, simple exports.
How do I fix crashes during SFM compile?
A: Increase virtual memory, reduce scene complexity, close background apps, and update your GPU drivers fully.
What software should I use after compiling?
A: DaVinci Resolve is the best free professional tool for color grading and assembling your compiled SFM footage.
Conclusion
SFM Compile is the most important skill any Source Filmmaker animator can master for professional results. This guide covered every essential topic from basic settings to advanced cinematic rendering techniques clearly. Understanding render passes, resolution, lighting, and output formats improves your final video quality dramatically. Fixing common errors like missing textures and memory crashes becomes simple once you know the correct solutions.
Advanced techniques like depth of field, three-point lighting, and post-processing elevate your work significantly. Start with simple settings, practice consistently, and use the amazing free resources the SFM community offers. Every great animator started as a beginner who was willing to learn and keep improving daily. Apply this guide fully, and your Source Filmmaker renders will always reach a truly professional standard.