Concept Art to 3D Model conversion is one of the most valuable skills in modern game development, animation, and film production. It is the process of taking a flat illustration and turning it into a fully realized object that can be viewed from every angle, animated, and placed inside a digital world. For decades, this transformation required years of training in sculpting, anatomy, and software like Maya or ZBrush. Today, the landscape has changed dramatically.
We are now in an era of AI-assisted modeling, where the distance between an idea and a finished asset is measured in seconds rather than hours. Yet despite these advances, the core principles of good Concept Art to 3D Model conversion remain rooted in solid fundamentals, proportion, silhouette, and faithfulness to the original design vision. This guide breaks down everything you need to know about this workflow, from the reasons it matters to the tools, techniques, and common mistakes artists make along the way.
Whether you’re a hobbyist exploring 3D printing or a studio professional refining a character pipeline, understanding this process will help you produce better assets in less time. We’ll also explore how AI tools are reshaping the industry without replacing the artistic judgment that makes a model feel alive. By the end of this article, you’ll have a clear roadmap for turning any concept sketch into a polished, production-ready 3D model, and you’ll understand why so many studios treat this pipeline as the backbone of their entire creative process.
Why Concept Art to 3D Model Pipelines Matter
A strong Concept Art-to-3D Model workflow turns a static idea into something usable across games, films, and interactive media. Without this step, even the most beautiful illustration remains just a picture; it can’t move, animate, or exist inside a 3D environment. Studios depend on this pipeline to keep characters, props, and environments visually consistent throughout a production, which is especially important when dozens of artists are working on the same project simultaneously.
This process also gives teams the flexibility they wouldn’t otherwise have. A structured approach saves time, reduces guesswork, and uncovers potential challenges early, helping resolve them before they become roadblocks. When everyone follows the same conversion pipeline, fewer surprises occur during production, and revisions become far easier to manage than starting from scratch.
Maintaining Visual Consistency Across a Project
When multiple 3D artists work from the same concept sheet, the final assets need to feel like they belong in the same universe. A clear Concept Art to 3D Model pipeline ensures that proportions, color language, and stylistic choices stay aligned from the first sketch to the final render.
Without this consistency, a game or film can feel visually disjointed, breaking immersion for players and viewers alike. Establishing clear reference sheets and model guides early on prevents this problem from spiraling out of control later in production.
Reducing Costs Through Efficient Revisions
Redrawing concept art from multiple angles every time a client requests a change is expensive and slow. It’s often far simpler to adjust an existing 3D model than to recreate flat artwork from scratch.
This is one of the most underrated benefits of a clean Concept Art to 3D Model workflow; it builds in flexibility from day one. Studios that invest in solid 3D foundations early save significant time and budget across the entire production cycle, especially during late-stage client feedback rounds.
The Traditional Concept Art to 3D Model Process
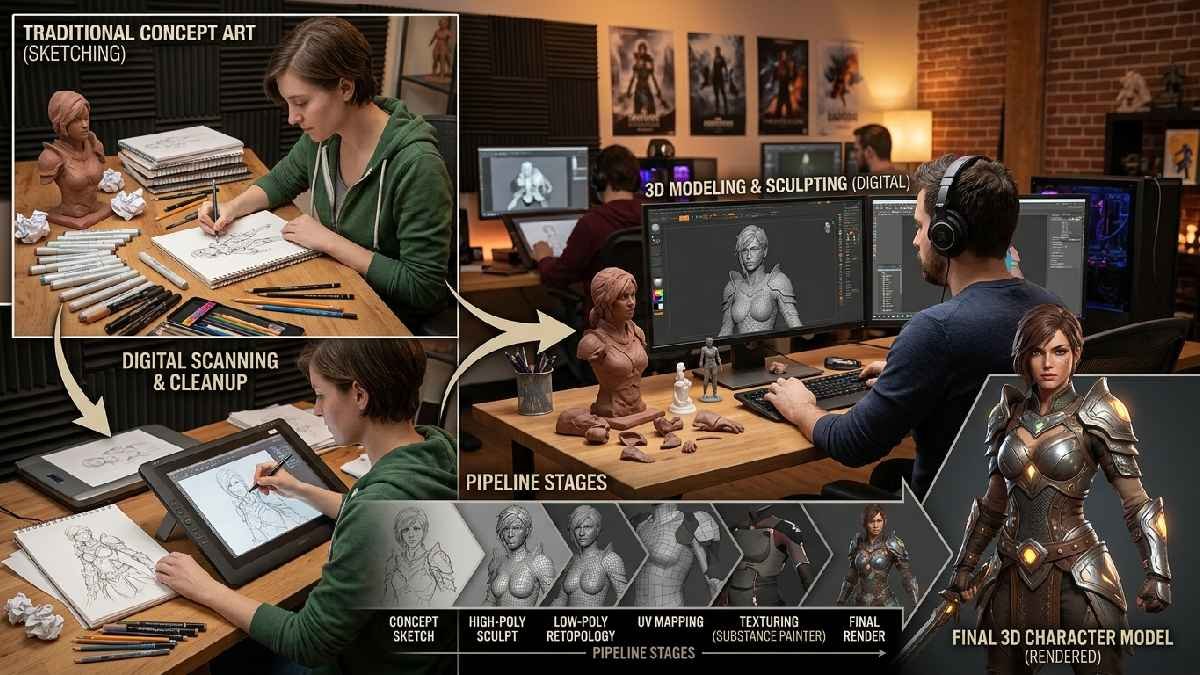
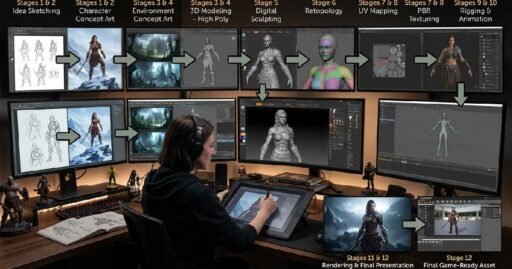
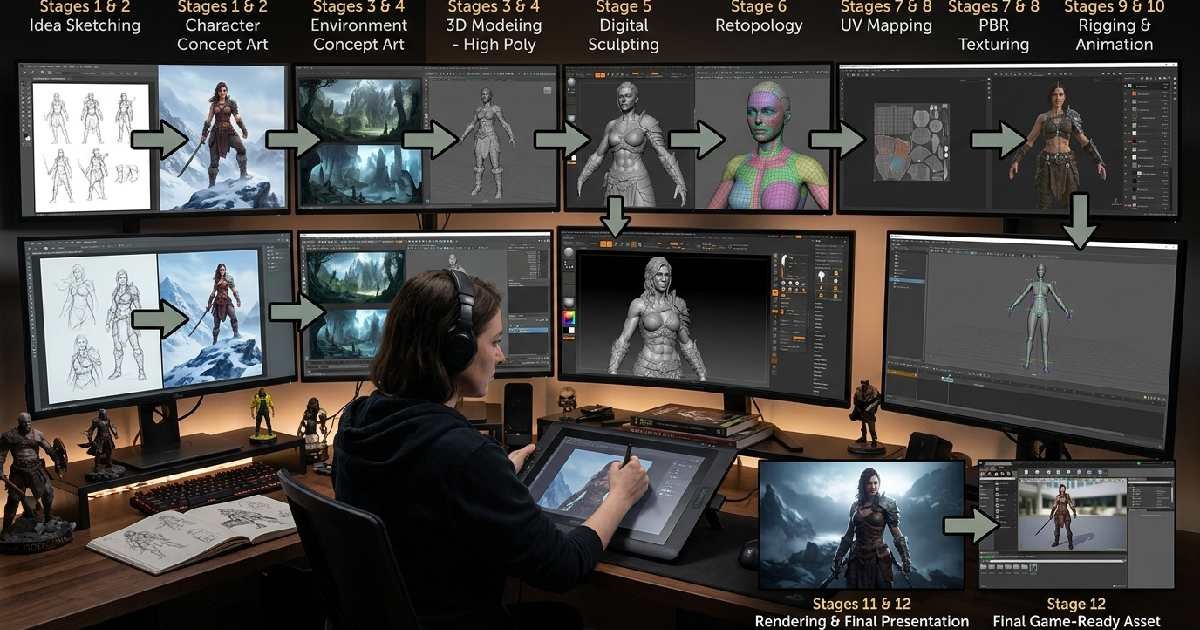
Before AI tools entered the scene, Concept Art to 3D Model conversion followed a fairly standardized path. Every great 3D model begins with a solid concept, starting with sketches that iterate on the design until it feels cohesive and aligned with the artist’s vision. From there, artists typically create a model sheet showing the character or object from multiple angles.
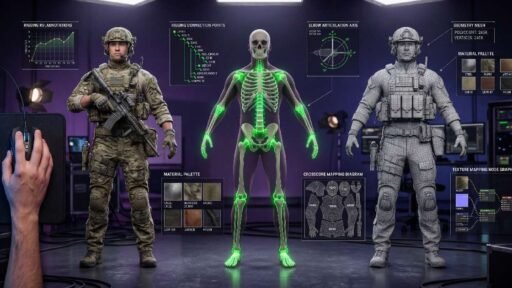
These reference images are scanned and imported into 3D software, where they’re aligned as reference planes to keep proportions consistent across every view. This step is critical, since blind spots in concept art can create real headaches once modeling begins.
Building the Base Mesh and Sculpting Details
Artists start by blocking out a rough base mesh. This establishes proportions before adding fine details. A Subdivision Surface Modifier is often applied to smooth the geometry. Sculpting brushes then refine organic shapes like faces.
Clothing folds and wrinkles get added next. This stage demands patience and a steady hand. Small proportion errors here cause bigger problems later. Careful work now saves time afterward.
UV Mapping and Texturing the Model
After sculpting, the model needs to be prepared for color and surface detail. Artists mark seams to prepare for UV unwrapping, then organize the layout to minimize distortion before applying textures.
Texturing often happens directly in the 3D viewport or through external software like Substance Painter, layering base colors and surface details. This stage brings the model’s final look much closer to the original concept art’s intended mood and palette.
How AI Is Transforming Concept Art to 3D Model Conversion
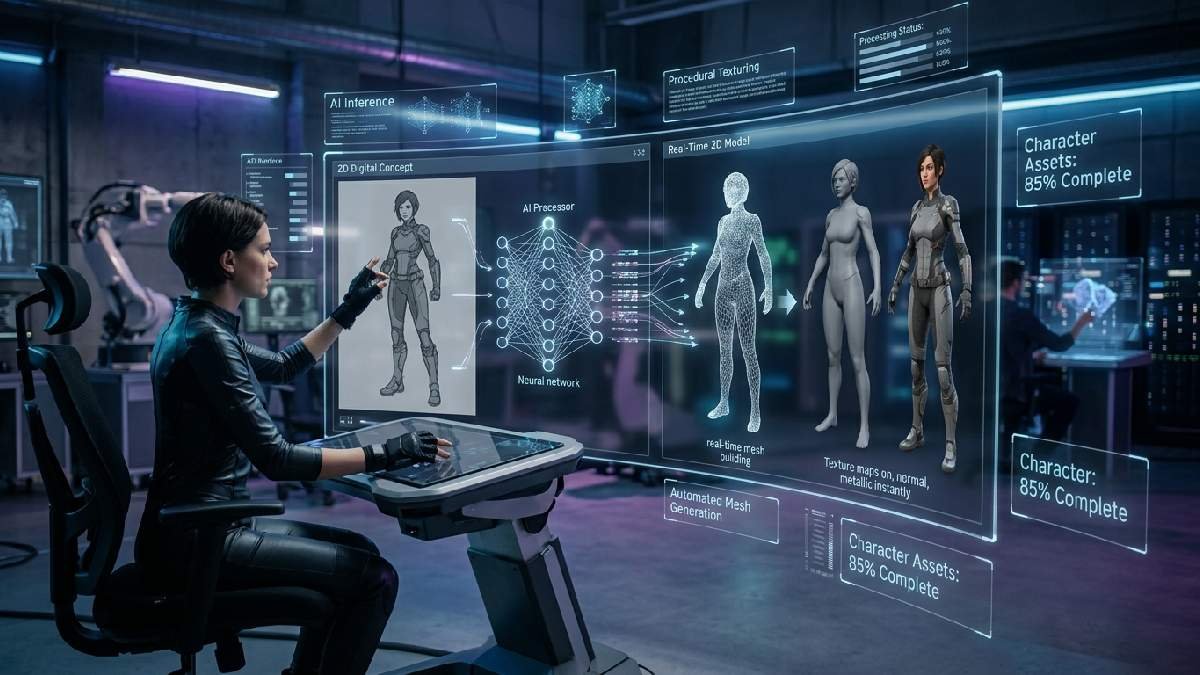
The biggest shift in recent years has been the rise of AI-powered Image-to-3D tools. Instead of manual extrusion and vertex pushing, artists can now upload their concept art, and the AI interprets lighting, depth, and form to generate a 3D mesh automatically. This doesn’t eliminate the artist’s role, but it dramatically reduces the time spent on early-stage blocking and rough geometry.
These AI sketch-to-3D tools analyze the outlines and shapes in a drawing and reconstruct them into a 3D mesh without manual modeling, turning what once took hours into minutes. For indie developers and small studios without dedicated 3D teams, this shift has been genuinely transformative.
Popular AI Tools for Image-to-3D Conversion
Several platforms now lead this space. Meshy is purpose-built for sketch-to-3D conversion without requiring modeling skills, supporting a workflow of cleanup, upload, prompt refinement, and export to formats like GLB, FBX, or STL.
Other tools like Sloyd and Hitem3D offer similar capabilities, with platforms generating high-fidelity, production-ready 3D models with clean geometry and realistic PBR textures from even single-view reference images.
Best Practices When Using AI Conversion Tools
Getting good results from AI tools requires some preparation on the artist’s part. If concept art shows multiple characters or objects, cropping the image so only one subject is generated at a time produces cleaner results.
Transparent or glass-like textures are also difficult for AI to interpret depth-wise, so solid surfaces tend to render best. For text-based generation, being specific about materials and using style keywords like “low poly” or “realistic” helps guide the AI toward the intended aesthetic.
Choosing the Right Tools for Your Workflow
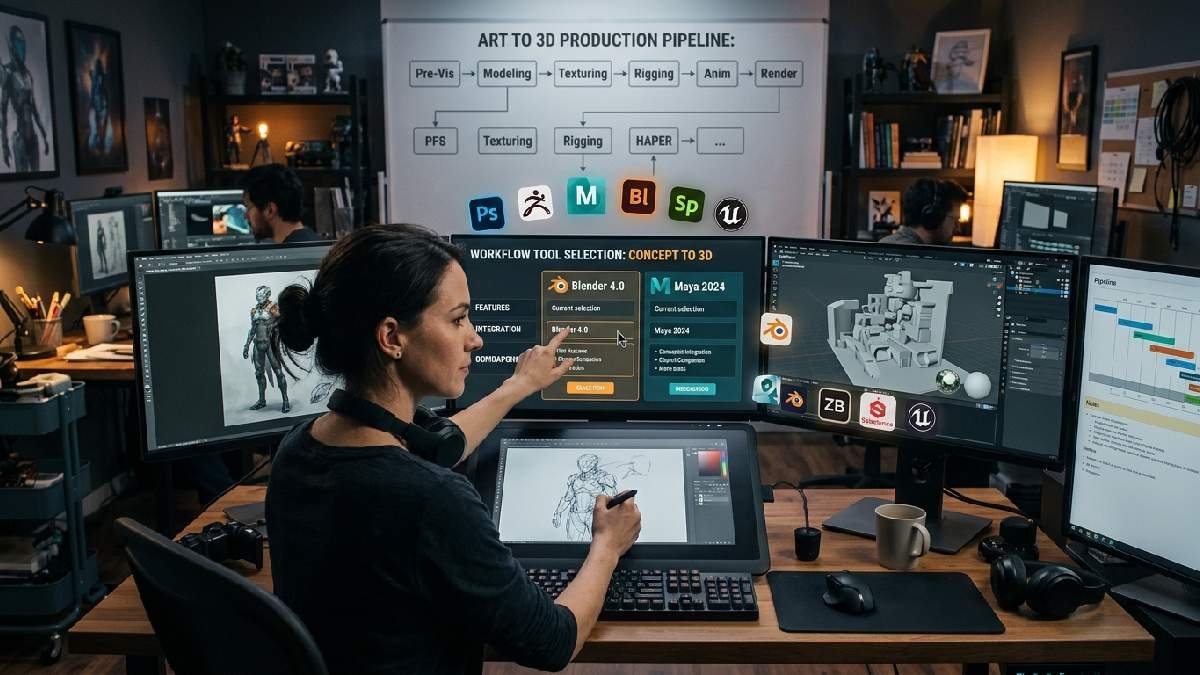
Picking the right software for Concept Art to 3D Model conversion depends heavily on your project’s scale, budget, and the complexity of your assets. Some artists prefer fully manual control over every sculpting detail, while others lean on AI-assisted speed for fast early iterations before refining things by hand later.
Studios with bigger budgets often invest in multiple professional tools that work together across the pipeline. Freelancers, on the other hand, usually favor free or low-cost options. There’s no single correct toolset; the best choice always fits your team’s skills, timeline, and production goals.
Manual Modeling Software for Full Creative Control
Traditional software remains the gold standard for full control. Blender is free and open-source, with strong community support. ZBrush remains the choice for professional sculpting, especially for organic characters and creatures.
It handles fine detail well. Maya is common in larger studios. It’s used for rigging and animation after modeling. Many pipelines combine all three tools. This gives artists flexibility and precision.
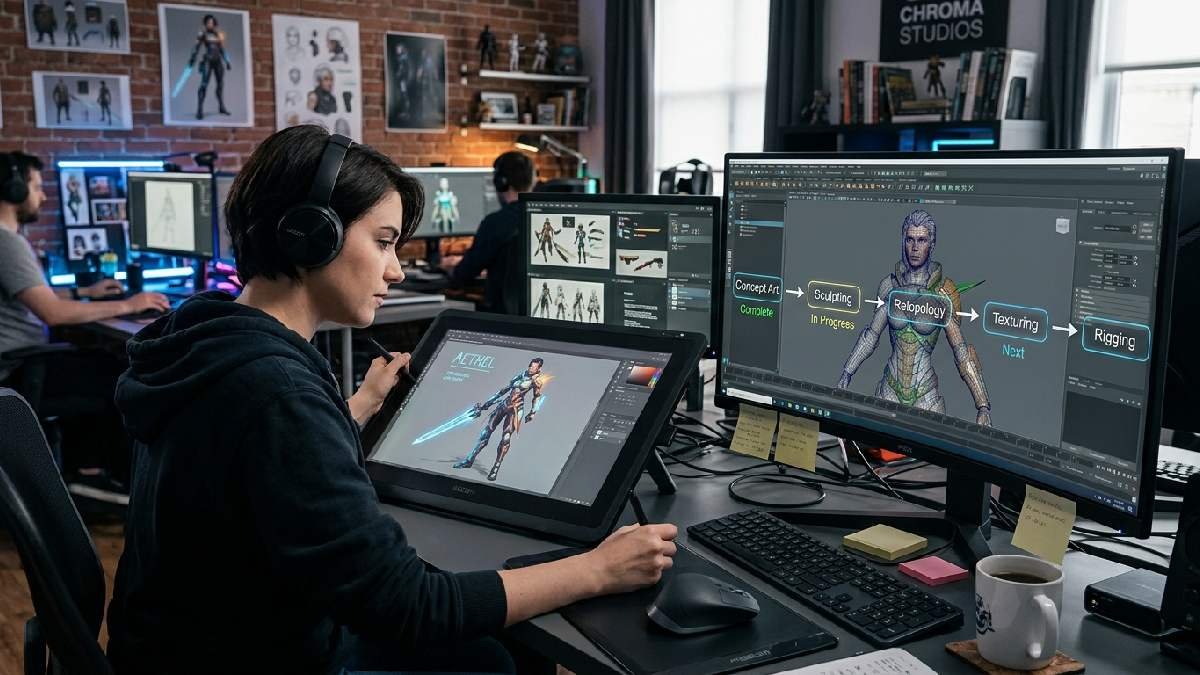
Hybrid Workflows Combining AI and Manual Refinement
Many professionals blend AI speed with manual skill. Using AI for initial conversion, then refining the mesh in Blender, is the most efficient workflow for character art. AI handles rough blocking fast.
Artists then fix proportions and add detail. This saves significant production time. The final asset still feels handmade. Studios increasingly adopt this hybrid method today.
FAQ
What software is best for Concept Art to 3D Model conversion?
Blender, ZBrush, Maya, and Meshy are widely used industry options.
Can AI tools fully replace manual 3D modeling?
No, AI speeds up blocking, but artists refine final details.
What image type works best for AI conversion?
Clean, single-subject images with plain backgrounds work best.
How long does manual concept-to-3D conversion take?
It varies, but it can take several days for detailed characters.
Do I need 3D modeling skills to use AI tools?
No, most AI platforms require no prior modeling experience.
Conclusion
Concept Art to 3D Model conversion continues to evolve rapidly, blending decades-old artistic principles with cutting-edge AI technology. Whether you choose a fully manual pipeline through Blender and ZBrush or lean on AI tools like Meshy and Sloyd for faster results, the goal remains the same: preserving the soul of the original design while making it functional in three-dimensional space.
Studios and independent artists alike now have more options than ever to bring their sketches to life. As these tools continue improving, the barrier between imagination and finished 3D asset will keep shrinking, making this an exciting time to work in concept art and 3D production.